
Mar 23rd - Stamping Master Class - Deadline - Mar 15th
4 posters
Page 1 of 1

Mar 23rd - Stamping Master Class - Deadline - Mar 15th
![]() by Jane Fri Jan 16, 2015 11:55 pm
by Jane Fri Jan 16, 2015 11:55 pm
Ok, we want to get some different techniques covered here......Masking, 2nd/3rd impressions, Kissing, Highlighting in colour - pick one or maybe you have another suggestion!!
Last edited by Jane on Thu Mar 19, 2015 6:18 pm; edited 1 time in total

Jane- Admin-Tutor
- Posts : 1022
Join date : 2009-11-16
Age : 66
Location : Surrey -

Re: Mar 23rd - Stamping Master Class - Deadline - Mar 15th
![]() by dawn h Sat Jan 17, 2015 7:28 am
by dawn h Sat Jan 17, 2015 7:28 am
What about a post about other things you can stamp with, like found objects, bubble wrap, carve own from erasers, using dies to cut funky foam to make own stamps, show can use paints, pens as well as inks.
another idea reversing the image using a brayer.
I could split into two posts do a small sample for each to show alternative to stamps for one post and different media to stamp with for the second, just a thought.
oh and I wouldn't turn down a bit of kissing. lol
another idea reversing the image using a brayer.
I could split into two posts do a small sample for each to show alternative to stamps for one post and different media to stamp with for the second, just a thought.
oh and I wouldn't turn down a bit of kissing. lol

dawn h- DT Member
- Posts : 247
Join date : 2014-03-22
Age : 42
Location : Barnoldswick, Lancashire -
Re: Mar 23rd - Stamping Master Class - Deadline - Mar 15th
![]() by Jane Sat Jan 17, 2015 1:38 pm
by Jane Sat Jan 17, 2015 1:38 pm
dawn h wrote:What about a post about other things you can stamp with, like found objects, bubble wrap, carve own from erasers, using dies to cut funky foam to make own stamps, show can use paints, pens as well as inks.
another idea reversing the image using a brayer.
I could split into two posts do a small sample for each to show alternative to stamps for one post and different media to stamp with for the second, just a thought.
oh and I wouldn't turn down a bit of kissing. lol
Haha Dawn......who would it be, the kissing????

These were the suggestions put forward by Sandy, if you want to do a split post then please do.....just don't want to give you too much work!!
Jane- Admin-Tutor
- Posts : 1022
Join date : 2009-11-16
Age : 66
Location : Surrey -
Re: Mar 23rd - Stamping Master Class - Deadline - Mar 15th
![]() by dawn h Sun Jan 18, 2015 7:32 pm
by dawn h Sun Jan 18, 2015 7:32 pm
I'd like to, think it'd be a good part if calling it masterclass week ...now the kissing that would be telling, plenty of choice have them lining up i do. lol David's the best though but Bobby comes a close second and Oscar...my male kitten and cat, Oscar the big cat described by vet as a donkey lifts his head up pushes his face forward whilst I pretend kiss him, and Bobby boo the male kitten has decided he likes the full on approach and licks my face lol
dawn h- DT Member
- Posts : 247
Join date : 2014-03-22
Age : 42
Location : Barnoldswick, Lancashire -
Re: Mar 23rd - Stamping Master Class - Deadline - Mar 15th
![]() by Pauline Wheeler Mon Mar 09, 2015 6:26 pm
by Pauline Wheeler Mon Mar 09, 2015 6:26 pm
I will use masking technique for my (yet unknown) project 
Pauline Wheeler- Guest Designer
- Posts : 229
Join date : 2014-05-29
Re: Mar 23rd - Stamping Master Class - Deadline - Mar 15th
![]() by Neil Wed Mar 11, 2015 9:39 am
by Neil Wed Mar 11, 2015 9:39 am
I thought I'd do stamp flipping
Stamps are so versatile, there are so many different images and styles around I'm sure we all have loads in our crafty stash. Every now and again though, I look at a stamp and wish I had it facing the other way. (I know, there's no pleasing some folks is there?!) so today I thought I'd share how I "flip" my stamps

Begin by stamping your chosen image onto white paper in archival ink and cut it out.
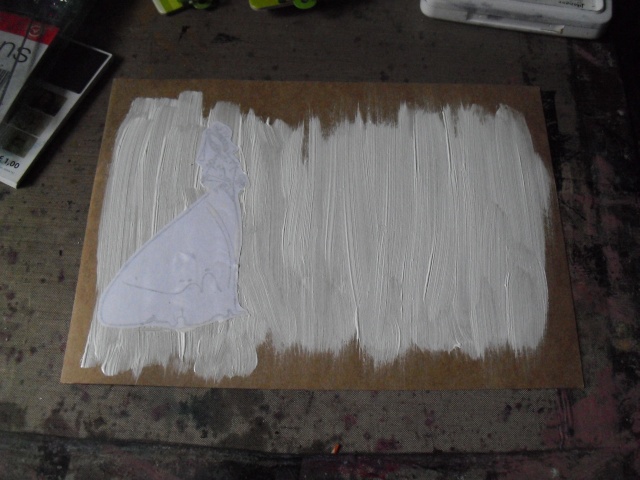
Brush a layer of Gesso onto the surface and while wet press your stamped image face down. Press down well and leave to dry thoroughly.

When dry, spritz with water and gently begin to rub the paper off to reveal the image. The keyword is gently! If you rub too hard you are liable to rub off the image too.

If you stamp your image again directly onto the surface you can see how you have a mirror image which I think is pretty cool.
I think it's a fun technique to do though I will finish off with a few suggestions which hopefully will minimize any frustrations......
Remember that by doing this with a stamp you are reversing it so writing will not work.
Also remember that your reversed image is not going to be as crisp as the original so I would personally recommend that you use them seperately as putting them together on one project kind of "highlights" the fade making it look shabbier than if you used it on it's own.
So, to illustrate my point; I used both images on this card.....

You can see that the image on the left is faded much more than the image on the right which is stamped onto the dry gesso.
I've coloured both images with the same Distress Marker and the one on the left has not blended as smoothly as the right because it reacts differently. The reason being that it is effectively a different surface to the gesso as it still has paper residue on it which both absorbs color into the fibres causing bleeding and making it harder to blend.
So generally not a very successful card.

However, if we then split the images (Literally, I just sliced the card in half!) and use the pieces individually I can make a card using the flipped image which I think looks so much better because it is no longer competing with the crisper image.

The other piece mounted onto a 10" tag covered in Tim Holtz Tissue paper makes a very pretty matching gift tag too.
Materials
http://www.thecraftbarn.co.uk/300g-coloured-card-ice-white.html
http://www.thecraftbarn.co.uk/decoart-gesso.html
http://www.thecraftbarn.co.uk/distress-ink-pad-vintage-photo.html
http://www.thecraftbarn.co.uk/ranger-archival-ink-pad-jet-black.html
http://www.thecraftbarn.co.uk/stampers-anonymous-tim-holtz-runway.html
http://www.thecraftbarn.co.uk/stampers-anonymous-tim-holtz-haberdashery.html
http://www.thecraftbarn.co.uk/colour-texture/pens-pencils-blocks-and-chalks/distress-markers.html
http://www.thecraftbarn.co.uk/stix2-flushedged-double-sided-tape-24mm.html
Kraft card, white paper, lace and ribbon
Stamps are so versatile, there are so many different images and styles around I'm sure we all have loads in our crafty stash. Every now and again though, I look at a stamp and wish I had it facing the other way. (I know, there's no pleasing some folks is there?!) so today I thought I'd share how I "flip" my stamps
Begin by stamping your chosen image onto white paper in archival ink and cut it out.
Brush a layer of Gesso onto the surface and while wet press your stamped image face down. Press down well and leave to dry thoroughly.
When dry, spritz with water and gently begin to rub the paper off to reveal the image. The keyword is gently! If you rub too hard you are liable to rub off the image too.
If you stamp your image again directly onto the surface you can see how you have a mirror image which I think is pretty cool.
I think it's a fun technique to do though I will finish off with a few suggestions which hopefully will minimize any frustrations......
Remember that by doing this with a stamp you are reversing it so writing will not work.
Also remember that your reversed image is not going to be as crisp as the original so I would personally recommend that you use them seperately as putting them together on one project kind of "highlights" the fade making it look shabbier than if you used it on it's own.
So, to illustrate my point; I used both images on this card.....
You can see that the image on the left is faded much more than the image on the right which is stamped onto the dry gesso.
I've coloured both images with the same Distress Marker and the one on the left has not blended as smoothly as the right because it reacts differently. The reason being that it is effectively a different surface to the gesso as it still has paper residue on it which both absorbs color into the fibres causing bleeding and making it harder to blend.
So generally not a very successful card.
However, if we then split the images (Literally, I just sliced the card in half!) and use the pieces individually I can make a card using the flipped image which I think looks so much better because it is no longer competing with the crisper image.
The other piece mounted onto a 10" tag covered in Tim Holtz Tissue paper makes a very pretty matching gift tag too.
Materials
http://www.thecraftbarn.co.uk/300g-coloured-card-ice-white.html
http://www.thecraftbarn.co.uk/decoart-gesso.html
http://www.thecraftbarn.co.uk/distress-ink-pad-vintage-photo.html
http://www.thecraftbarn.co.uk/ranger-archival-ink-pad-jet-black.html
http://www.thecraftbarn.co.uk/stampers-anonymous-tim-holtz-runway.html
http://www.thecraftbarn.co.uk/stampers-anonymous-tim-holtz-haberdashery.html
http://www.thecraftbarn.co.uk/colour-texture/pens-pencils-blocks-and-chalks/distress-markers.html
http://www.thecraftbarn.co.uk/stix2-flushedged-double-sided-tape-24mm.html
Kraft card, white paper, lace and ribbon

Neil- DT Member
- Posts : 687
Join date : 2011-05-13
Age : 57
Location : Tonbridge in Kent -
Re: Mar 23rd - Stamping Master Class - Deadline - Mar 15th
![]() by Jane Sat Mar 21, 2015 2:19 am
by Jane Sat Mar 21, 2015 2:19 am
Oh wow Neil, this is amazing!! I'm so sorry I haven't replied before.
Thank you.
Thank you.
Jane- Admin-Tutor
- Posts : 1022
Join date : 2009-11-16
Age : 66
Location : Surrey -
Re: Mar 23rd - Stamping Master Class - Deadline - Mar 15th
![]() by Jane Tue Mar 24, 2015 12:59 am
by Jane Tue Mar 24, 2015 12:59 am
Thank you Pauline and Dawn for fabulous projects!!
Thursday - Dawn
Friday - Neil
Saturday - Pauline
Is that ok??
Thursday - Dawn
Friday - Neil
Saturday - Pauline
Is that ok??
Jane- Admin-Tutor
- Posts : 1022
Join date : 2009-11-16
Age : 66
Location : Surrey -
Re: Mar 23rd - Stamping Master Class - Deadline - Mar 15th
![]() by Pauline Wheeler Tue Mar 24, 2015 1:20 am
by Pauline Wheeler Tue Mar 24, 2015 1:20 am
Okey dokey Jane and thank you
I've
Sent my DT order off tonight so will get cracking when it arrives and try to get ahead if I can
Xx
I've
Sent my DT order off tonight so will get cracking when it arrives and try to get ahead if I can
Xx
Pauline Wheeler- Guest Designer
- Posts : 229
Join date : 2014-05-29
» Aug 31st - Stamping Bella - Deadline Aug23rd
» Feb 23rd - Triangles - Deadline Feb 22nd
» Feb 16th - Tando in Card Making - Deadline Feb 15th
» Feb 23rd - Triangles - Deadline Feb 22nd
» Feb 16th - Tando in Card Making - Deadline Feb 15th
Page 1 of 1
Permissions in this forum:
You cannot reply to topics in this forum